Using the Transform panel, make the line 100 pixels wide and 100 px high.
At the X,Y locations type 0. Now the upper left end of the line is aligned with the movieclip's point of origin. Now we will use a slightly altered version of William Tagliaferro's 3d Math library
Copy the following code and paste it into a text file named "3dmath.as"
The file should be placed in the same directory with the .fla file
I won't get into in-depth details of how vector rotations and transformations are done, later on you can find some very inderesting links of articles fully covering this topic. You can skip these explanations if you want and move to the next step.
The general idea is that new coordinates of the old vertex can derive from the old ones with the multiplication of the [x,y,z] matrix with a transformation matrix.
Where Xan stands for the rotation angle about X axis, Yan stands for rotation angle about Yaxis, Zan for the rotation angle about Z axis Just a brief description of 3dmath.as functions:
-
ObjPoint(x,y,z,xc,yc,MC,opt)
- render ()
Is the function used to initialize each vertice.
When opt = 0 the data is translated according to left hand cartesian system, if it is 1, it is translated according to cylindrical coordinates. Our previous code uses the cartesian system.
MC is the movie clip used to represent the vertex. Type "none" if you do not want your wireframe to display the vertices, but only the connecting lines.
x,y,z are the cartesian coordinates when using cartesian system. When using cylindrical coordinates, place in x the value of radius, that means the distance from the point of origin, y equals cartesian y (the projection of the point in Y axis) and z is the angle measured clockwise.
To get the whole picture, the axes and angle z are positioned as in the pic below:
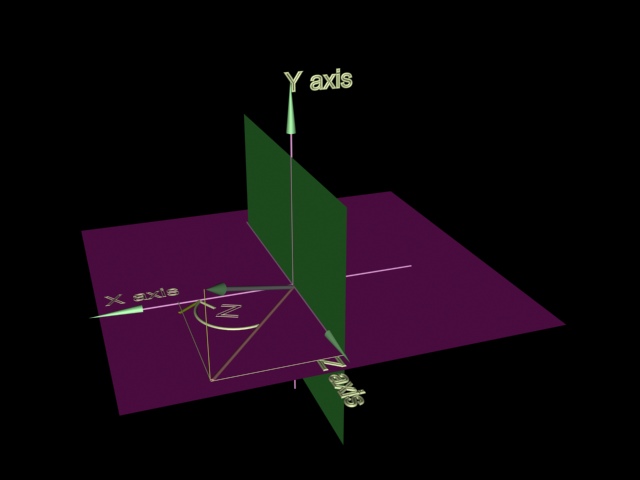
xc, yc define the "center point" of the object. Our word macro sets this to 0,0. You can place other values to this, if you want to make an object not only rotate, but orbit around an other point. Just make sure that all the points belonging to the same object have the same xc and yc values.
ObjMoveX(dist) and ObjMoveY(dist)
Are used to translate object rendering with a different xc, yc, that means to move the object.
These functions move the object within the movieclip; the visual result is the same by moving the moveclip itself.
This function gives the vertex movieclip its final screen coordinates. If you get large objects, you may reduce the factor in "this.scale*100" in obj._xscale and obj._yscale definitions.
xrot (t) yrot (t) zrot (t)
functions perform rotations about x,y,z axes respectively by given the angle t in degrees.
rotate (att) is used in rotating each point, according to the results of getmouse() function
perspective (eye)
is used for perspective correction for each point. The eye value is set at the start of 3dmath.as to 400, you can try different values if you want.
drawline (p1, p2, clr)
connects 2 points p1 and p2 with a line of color clr
getMouse()
Defines the rotation angle, depending on the plane of rotation and the mouse position. You can bias the speed of rotation by setting the * 0.03 factor to another value.
Now we will use the library in our movieclip
Drag the line movieclip into the stage, and give it a duration of 5 frames. Name the istance of this movieclip "mline"
Create a seperate layer and name it "actions"
Create a keyframe on frame 1 of the actions layer, and type the following code:
#include "3DMath.as"
displaypoints=false;
The displaypoints attribute defines the appearance of the object; if it is set to true then you will see only its vertices. If it is set to false you will see the object as a wireframe.
Set a keyframe on frame 2 of the actions layer and paste the text you have in MS Word. Set a keyframe on frame 2 of the actions layer and paste the following actions:
These functions move the object with the arrow keys, rotate object points on the screen, and connect them with lines, if displaypoints is set to false. Set a keyframe on frame 4 of the actions layer and type the following code:
gotoAndPlay (3);
This ensures repeated execution of the rendering functions which reside in the actions of frame 3. You must make now a movieclip which will be used to represent each vertex on the screen, in case displaypoints parameter is set to true
Create a new movieclip, and assign it a name. Draw a circle which is aligned to the center of the stage and paint it with any solid color or gradient you want. Right click your movieclip on the library and choose "Linkage..." .
Select "Export this symbol" and type in the "Identifier" input box the name "sphere"
Return to the scene edit mode and drag your movieclip onto the stage Test your movie
Pat yourself on the back; you have done a good job!
If something doesn't work or you're just too lazy, you can download the files used in this tutorial here